Configure Output from SAP Spool
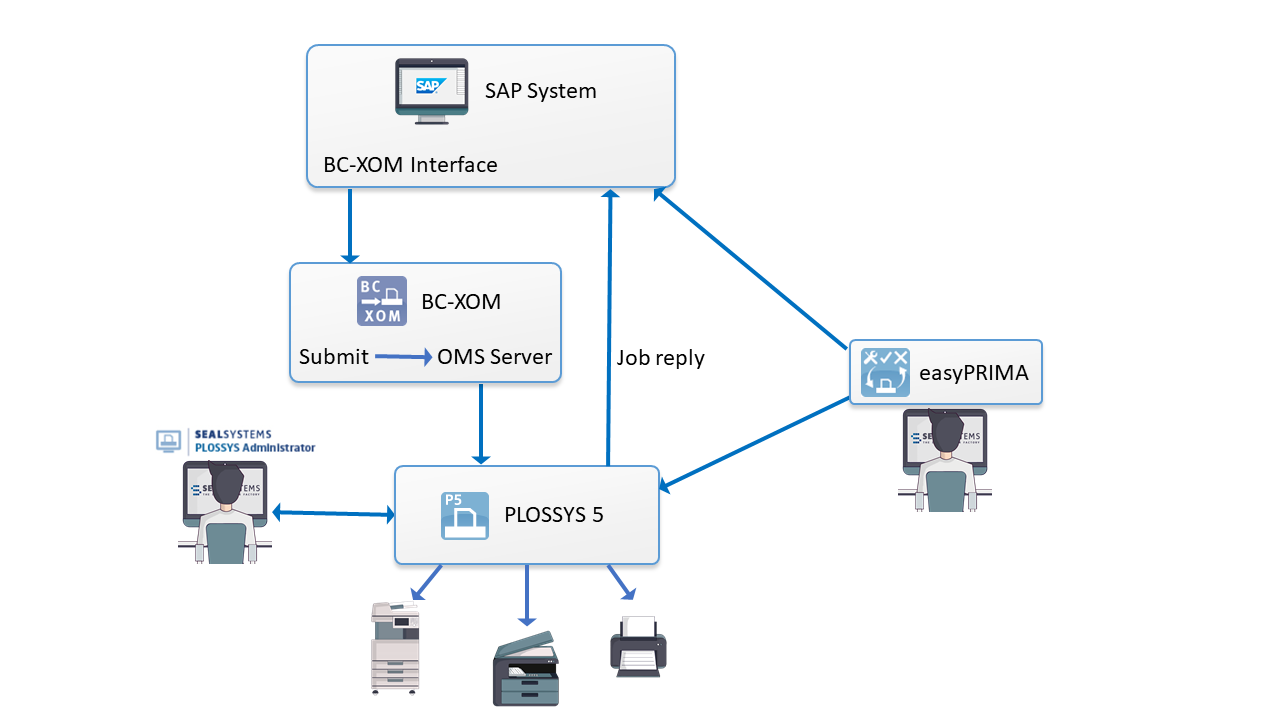
The printer is configured for BC-XOM in the SAP system. The BC-XOM interface from SEAL Systems accepts the job and transmits it via IPP or IPPS to the PLOSSYS 5 server. PLOSSYS 5 processes the job and returns the job status to the SAP system via RFC callback.

Hint - Microsoft C++ runtime
Make sure that the required Microsoft C++ runtime has been installed. For more information, refer to Requirements.
Install SAP NetWeaver RFC
-
Open SAP Launchpad in a Web browser:
https://launchpad.support.sap.com/ -
Log on with your SAP user name and password.
-
In SAP Launchpad, search for the OSS number
2573790. -
Follow the download link for
SAP NW RFC SDK 7.50and save the current version. -
Unpack
SAP NW RFC SDK:Expand-Archive -LiteralPath 'nwrfc750P_8-70002755.zip' -
Copy the files to the following directory:
C:\Program Files\SAP\nwrfcsdk -
Add the following path to the global environment variable
PATHin Windows:;C:\Program Files\SAP\nwrfcsdk\lib
Configure SAP NetWeaver RFC with an Application Server
-
Generate the following file:
C:\ProgramData\SEAL Systems\config\sapnwrfc.ini -
Specify the connection data to the SAP system in this file:
ASHOST=<ip_address>
SYSNR=<number>
Example - SAP configuration file
sapnwrfc.iniDEST=W74 ASHOST=10.100.100.100 TRACE=0 USER=sapuser PASSWD=sappassword CLIENT=310 SYSNR=01The
sapnwrfc.iniconfiguration file has the same syntax assaprfc.ini.Literature -
saprfc.iniThe
saprfc.inifile is described in SAP Basis Configuration - Server. -
Restart the following service:
seal-job-notifier
Configure SAP NetWeaver RFC with a Message Server
-
Create the following file:
C:\ProgramData\SEAL Systems\config\saprfc.ini -
Specify the connection data to the SAP system in this file:
MSHOST=<sap_server_name>
GROUP=<group_name>
Example - SAP configuration file
sapnwrfc.iniDEST=W74 MSHOST=10.100.100.100 GROUP=PUBLIC CLIENT=000 USER=rfctest PASSWD=ides1234567 TRACE=0Example - SAP configuration file
sapnwrfc.iniwithR3NAMEDEST=WMS R3NAME=W74 GROUP=PUBLIC MSHOST=10.100.100.100 CLIENT=000 USER=rfctest PASSWD=ides1234567 TRACE=0The
sapnwrfc.iniconfiguration file has the same syntax assaprfc.ini.Literature -
saprfc.iniThe
saprfc.inifile is described in SAP Basis Configuration - Server. -
Specify the port of the SAP system in:
C:\windows\system32\drivers\etc\services -
Restart the following service:
seal-job-notifier
Configure BC-XOM in SAP
Literature - BC-XOM
The configuration of BC-XOM in SAP is described in BC-XOM - OMS Connection.
Hint - supported
PLOSSYS 5 only supports OMS Server or OMS Submit and the transmission via IPP.
Configure the SAPGOF Converter on the PLOSSYS 5 Server
Literature - SAPGOF Converter
For further information about how to configure the SAPGOF Converter, refer to the SAPGOF Converter documentation.
By default, the SAPGOF Converter uses the following configuration files:
-
C:\Program Files\SEAL Systems\seal-convert-sapgof\lib\config\CONFIG -
C:\Program Files\SEAL Systems\seal-convert-sapgof\lib\config\GRIBS74_PDF_DB
For using another configuration, specify the following Consul keys:
-
CONFIG: Customized content of theCONFIGconfiguration file -
GRIBS74_PDF_DB: Customized content of theGRIBS74_PDF_DBconfiguration file
Import the CONFIG File with PLOSSYS CLI
-
Copy
C:\Program Files\SEAL Systems\seal-convert-sapgof\lib\config\CONFIGtoconfig_tmp.yml. -
Adjust
config_tmp.ymlaccording to the YAML format by indenting each line by four blanks and inserting the following lines at the beginning of the file:convert-sapgof: CONFIG:Hint - syntax
The data consists of multiple lines. For preserving the line endings, store the value in literal style, indicated by a
|. You have to indent all lines of the text. The leading spaces will not be part of the data retrieved by the service.Example - literal style
convert-sapgof: CONFIG: | This is a multiline value. -
Customize the settings in
config_tmp.ymland save the file. -
plossys config import config_tmp.yml -
Restart the following service:
seal-convert-sapgof
Import the GRIBS74_PDF_DB File with PLOSSYS CLI
-
Copy
C:\Program Files\SEAL Systems\seal-convert-sapgof\lib\config\GRIBS74_PDF_DBtogribs_tmp.yml. -
Adjust
gribs_tmp.ymlaccording to the YAML format by indenting each line by four blanks and inserting the following lines at the beginning of the file:convert-sapgof: GRIBS74_PDF_DB: -
Customize the settings in
gribs_tmp.ymland save the file. -
plossys config import gribs_tmp.yml -
Restart the following service:
seal-convert-sapgof
Advanced Configuration
The following keys influence the behavior of the output from SAP:
-
MAX_INSTANCES: Maximum of parallel conversions -
TIMEOUT: Time interval after which a conversion is aborted if it has not generated any new data
For how to configure the stamping of SAP output jobs, refer to Configure Stamps from SAP Output Jobs.
Literature - SAPGOF Converter
For further information about how to configure the SAPGOF Converter, refer to the SAPGOF Converter documentation.